【Flutter】MacBook Pro2023への 開発環境構築メモ
MacBook Pro 2023へFlutter開発環境を構築した際の個人メモです。
Android Studio
JetBrains ToolBoxをインストール済みであったため以下の手順でインストールした。
- JetBrains ToolBoxからインストール
- 初回起動なので設定のインポートはしない。
- スタンダード設定でインストール
Xcode
AppStoreからXcodeをインストールする。その後以下のコマンドを実行する。
$ sudo xcode-select --switch /Applications/Xcode.app/Contents/Developer
$ sudo xcodebuild -runFirstLaunch
Flutter SDK
Rosettaを インストールする。
$ sudo softwareupdate --install-rosetta --agree-to-licenseFlutter公式サイトからApple Ailicon用SDKをダウンロードし、任意のフォルダへ解凍し flutter/bin へPATHを通す。
flutter doctorを実行し設定状況を確認する。
$ flutter doctor
[!] Android toolchain - develop for Android devices (Android SDK version 34.0.0)
✗ cmdline-tools component is missing
Run `path/to/sdkmanager --install "cmdline-tools;latest"`
See https://developer.android.com/studio/command-line for more details.
✗ Android license status unknown.
Run `flutter doctor --android-licenses` to accept the SDK licenses.
See https://flutter.dev/docs/get-started/install/macos#android-setup for
more details.
[✗] Xcode - develop for iOS and macOS
✗ Xcode installation is incomplete; a full installation is necessary for iOS
and macOS development.
Download at: https://developer.apple.com/xcode/download/
Or install Xcode via the App Store.
Once installed, run:
sudo xcode-select --switch /Applications/Xcode.app/Contents/Developer
sudo xcodebuild -runFirstLaunch
✗ CocoaPods not installed.
CocoaPods is used to retrieve the iOS and macOS platform side's plugin
code that responds to your plugin usage on the Dart side.
Without CocoaPods, plugins will not work on iOS or macOS.
For more info, see https://flutter.dev/platform-plugins
To install see
https://guides.cocoapods.org/using/getting-started.html#installation for
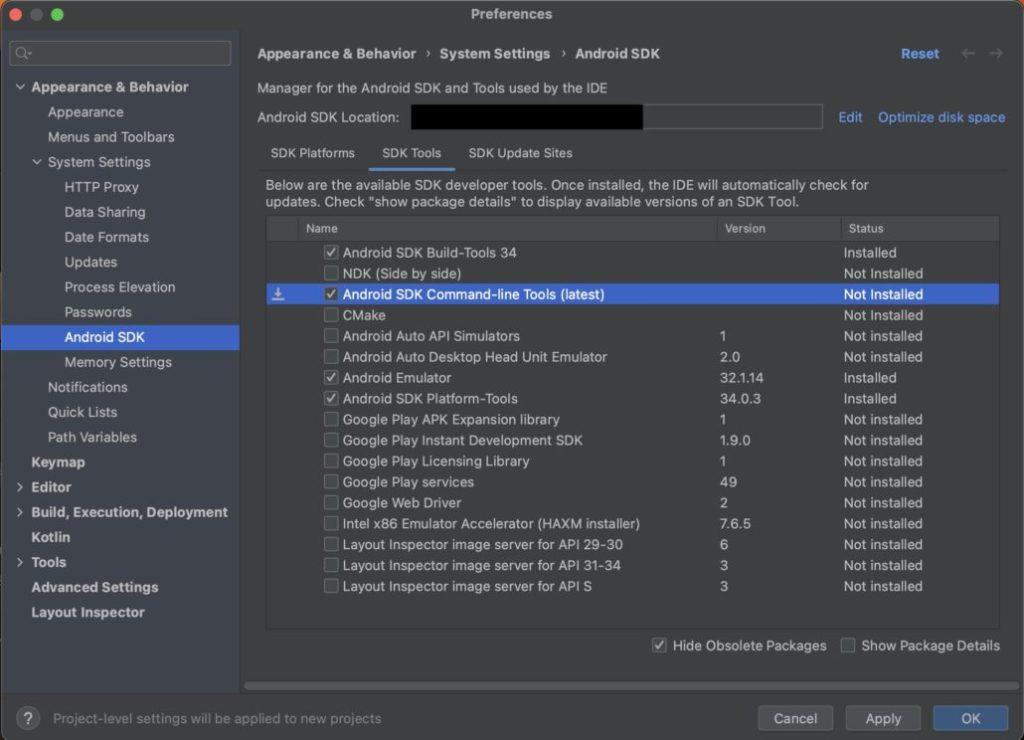
instructions.cmdline-toolsのインストール
Android Studioからcmdline-toolsをインストールする。以下の画像のように選択しApplyをクリックする。
Android ライセンス対応
以下のコマンドを実行しライセンスに同意する。
$ flutter doctor --android-licensesCocoaPods
以下のコマンドでCocoapodsをインストールしようとすると、MacのデフォルトのRubyのバージョンが2.6であるためインストールに失敗した。
$ sudo gem install cocoapodsRubyバージョンアップ
rbenvをインストールし最新安定バージョンのRubyをインストールする。
$ brew install ruby-build rbenv
$ rbenv init
.zshrcの末尾に以下を追加しターミナルを再起動
eval "$(rbenv init -)"Rubyの最新安定版 3.2.2をインストール
$ rbenv install 3.3.3
$ rbenv global 3.2.2
CocoaPodsをインストール
Rubyのバージョンアップ完了後に再度CodoaPodsをインストールする。
$ sudo gem install cocoapodsインストールが成功したのでflutter doctorが全てOKとなったことを確認できた。
$ flutter doctor
Doctor summary (to see all details, run flutter doctor -v):
[✓] Flutter (Channel stable, 3.10.5, on macOS 13.4 22F66 darwin-arm64, locale ja-JP)
[✓] Android toolchain - develop for Android devices (Android SDK version 34.0.0)
[✓] Xcode - develop for iOS and macOS (Xcode 14.3.1)
[✓] Chrome - develop for the web
[✓] Android Studio (version 2022.2)
[✓] IntelliJ IDEA Ultimate Edition (version 2023.1.3)
[✓] IntelliJ IDEA Ultimate Edition (version 2023.1.2)
[✓] IntelliJ IDEA Ultimate Edition (version 2023.1.3)
[✓] Connected device (2 available)
[✓] Network resources
Firebase
Firebase CLI
Firebase CLI をインストールするの手順にそってFirebase CLIをインストールする。
以下のコマンドでFirebase CLIをインストールする。
$ npm install -g firebase-tools以下のコマンドを実行しFirebase CLIへログインする。ブラウザが起動するのでGoogleアカウントを選択しログインする。
$ firebase login以下のコマンドを実行しプロジェクト一覧が取得できることを確認する。
$ firebase projects:listFlutterFire CLI
Flutter アプリに Firebase を追加するの手順にそってFlutterアプリでFirebaseを使用するための設定を行う。
$ dart pub global activate flutterfire_cliアプリの構成
$ cd Flutterアプリプロジェクトのルートディレクトリ
$ flutterfire configure

Firebase 上の既存プロジェクトを選択するか新規プロジェクトを作成する
Firebase関連のプラグインをインストールする。
$ flutter pub add firebase_core
$ flutter pub add firebase_auth
$ flutter pub add cloud_firestore
$ flutterfire configure